
When I first started hosting my website, I went the full stack route - spun up an EC2 instance, installed Linux, configured MySQL, and set up PHP. It felt like a rite of passage as a developer, and I firmly believe it’s something every dev should experience at least once. It’s not just about building a website - it’s about learning the inner workings of Apache, managing SSL certificates, and getting up close and personal with the command line.
However, there were a few small issues: it was costing me $25/month, it was cumbersome, and it was slow due to the small EC2 instance size. After a few months, I started wondering if I could host my website more cost-effectively. Spoiler alert: I could.
Today, I’m paying around $4 AUD / month, and my site runs faster, with automatic SSL, and I barely touch it after setup. Let me show you how I did it.
Why EC2 Isn’t Always the Best Option Running an EC2 instance with Linux, MySQL, and PHP might sound simple, but it gets expensive fast. Between the instance cost, EBS storage, and data transfer fees, it adds up. Don’t get me wrong—setting up a website this way gives you a deep understanding of server management, and you’ll learn invaluable skills for your career. But in reality, for a lot of static websites, it’s overkill.
Enter Hugo, AWS S3, and CloudFront After some research, I found a much cheaper and simpler solution: Hugo + S3 + CloudFront. This setup allows you to host a fast, secure, and scalable website with minimal costs and maintenance.
Here’s a breakdown of how you can set it up.
Build Your Site with Hugo
First of all, what is Hugo? Hugo is a fast and flexible static site generator that allows you to build websites using simple Markdown files, without the need for databases or complex server-side setups. It’s popular for its ease of use, wide range of themes, and ability to generate lightning-fast websites with minimal effort.
If you’ve never used Hugo before, the learning curve is pretty gentle, and there are heaps of themes to choose from. Feel free to explore the Hugo theme gallery.
You can read more about Hugo at their website.
Going forward, I’m going to pretend that we’re making a website at the domain/URL my-awesome-site.com. So whenever you see my-awesome-site.com, just insert your own domain/URL.
To get started:
- Install Hugo (you can find the installation steps on Hugo’s website).
- Create a new Hugo site:
hugo new site my-awesome-site
- Pick a theme and add your content in Markdown.
To run your hugo website locally and see what it looks like, run:
hugo serve
You will receive a URL in the command line (usually http://localhost:1313/) that you can navigate to in your browser to see a live preview of your website.
Set Up AWS S3 for Hosting
Your generated website will be in the /public directory of your repository. Now all we need to do is to host that content in the internet. Enter S3.
Here’s the process:
- In AWS, create an S3 bucket with a name that matches your domain or desired URL (e.g., my-awesome-site.com). Make sure the bucket is set for public read access (you’ll configure this through bucket policies).
- Once created, go to the “Properties” tab of your bucket and scroll down to “Static website hosting”. Select the “Edit” button. Here you will want to:
- set “Static website hosting” to “Enable”
- set “Hosting type” to “Host a static website”
- set the “Index document” to “index.html”
- Now navigate to the “Permissions” tab. “Block all public access” should be set to “off”.
- Copy & paste this into the “Bucket policy” input:
{
    "Version": "2012-10-17",
    "Statement": [
        {
            "Sid": "PublicReadGetObject",
            "Effect": "Allow",
            "Principal": "*",
            "Action": "s3:GetObject",
            "Resource": "arn:aws:s3:::my-awesome-site.com/*"
        }
    ]
}
- Now you will also create another bucket, that will match your desired domain or URL, but with “www.” prepended to it (e.g., www.my-awesome-site.com). The purpose of this bucket will be to redirect users who type in www.my-awesome-site.com to my-awesome-site.com.
- Once created, go to the “Properties” tab of your bucket and scroll down to “Static website hosting”. Select the “Edit” button. Here you will want to:
- set “Static website hosting” to “Disable”
- set “Hosting type” to “Redirect requests for an object”
- set the “Host name” to “my-awesome-site.com”
- set the “Protocol” to “https”
- Upload the contents of your public folder into your S3 bucket. At this point, you could technically serve your website directly from S3. But it would be from the S3 domain (e.g. http://my-awesome-site.s3-website-ap-southeast-2.amazonaws.com), would not support HTTPS protocol, and would have slower load times than we can get otherwise. To take take things a step further, we’ll integrate CloudFront. This will give us faster delivery of the website, automatic SSL support, and HTTPS redirect.
Configure CloudFront for Speed and SSL
CloudFront is AWS’s CDN service, and it’s perfect for distributing your content globally, reducing load times by serving your site from edge locations around the world.
To set it up:
- Create a CloudFront distribution.
- Select the “Origin domain” textfield. You should see your AWS S3 buckets drop down. Select the my-awesome-site.com bucket (not the www.my-awesome-site.com bucket).
- Leave the “Origin path” blank.
- Put in a name that you deem appropriate.
- For “Viewer protocol policy”, select “Redirect HTTP to HTTPS”.
For now, leave the rest of the configurations as their default value and create your distribution.
Once your distribution is spun up, select it’s ID from your list of distributions to view it’s details. Now you’ll want to:
- Scroll down to “Settings” and select “Edit”. Under the “Alternate domain name (CNAME) - optional” you’ll want to add two items.
- Add “my-awesome-site.com”.
- Add “www.my-awesome-site.com”.
- Under “Custom SSL certificate - optional” you can select “Request certificate”. This will take you to ACM and walk you through the steps of creating a certificate. Once it’s created, select that SSL certificate.
- Under “Default root object - optional”, input “index.html”.
- Save the settings.
Configure www. Redirect in CloudFront Okay so now we’ll be configuring our www. redirect within CloudFront. This will ensure that when we go to www.my-awesome-site.com, there will be an automatic redirect within the CloudFront layer that takes the user my-awesome-site.com.
Within CloudFront, you want to go to the “Functions” section. This is found on the left-hand side of the screen, behind a hamburger menu. Here we are going to write a small javascript script that will pick-up any requests that have the “www.” prepended to the domain, and redirect them to our site without the “www.”. Click on “Create function” to get started, and then follow the steps below:
- Name the function something appropriate.
- Select the latest version of cloudfront-js.
- Copy and paste the code below:
function handler(event) {
    var request = event.request;
    var headers = request.headers;
    var host = headers.host.value;

    // Check if the host is the naked domain
    if (host === 'www.my-awesome-site.com') {
        return {
            statusCode: 301,
            statusDescription: 'Moved Permanently',
            headers: {
                "location": {
                    "value": "https://my-awesome-site.com" + request.uri
                }
            }
        };
    }

    // If not the naked domain, just return the original request
    return request;
}
The script is pretty straightforward. It picks up any requests with a “www” in the hostname, then redirects the user to a domain without the “www.",and also ensures that the redirect follows the HTTPS protocol, along with the URI.
Now go back to your CloudFront Distribution, and select the “Behaviours” tab. Select the only behaviour that should be in your list of behaviours, and select the “Edit” button.
Scroll to the bottom of the page, to the “Function associations - optional” section. For the first row, select “CloudFront Functions” for the “Function type” field, and select your function name in the “Function ARN / Name” field.
Select the “Save changes” button.
Connecting to Route53
By now, we have our S3 bucket setup to hold our website content, and a CloudFront Distribution which caches the content in our S3 bucket, and stores a copy of it in servers all around the world. The final piece of this AWS configuration puzzle is to connect and configure our domain in Route53 to CloudFront.
In your Route53 domain configuration, you want to create a new record, specifically an A record. Follow these steps:
- Leave the subdomain field blank.
- For “Resource type”, select “A - Routes traffic to an IPV4 address and some AWS resources”.
- Turn on the “Alias” switch.
- For “Routes traffic to”, select “Alias to CloudFront distribution”.
- For the field under “Routes traffic to”, select your CloudFront distribution ID. It should look something like “a1234abcdef.cloudfront.net.”
Now create another A record and repeat steps from 1 to 5, but for step 1 input “www” for the subdomain value.
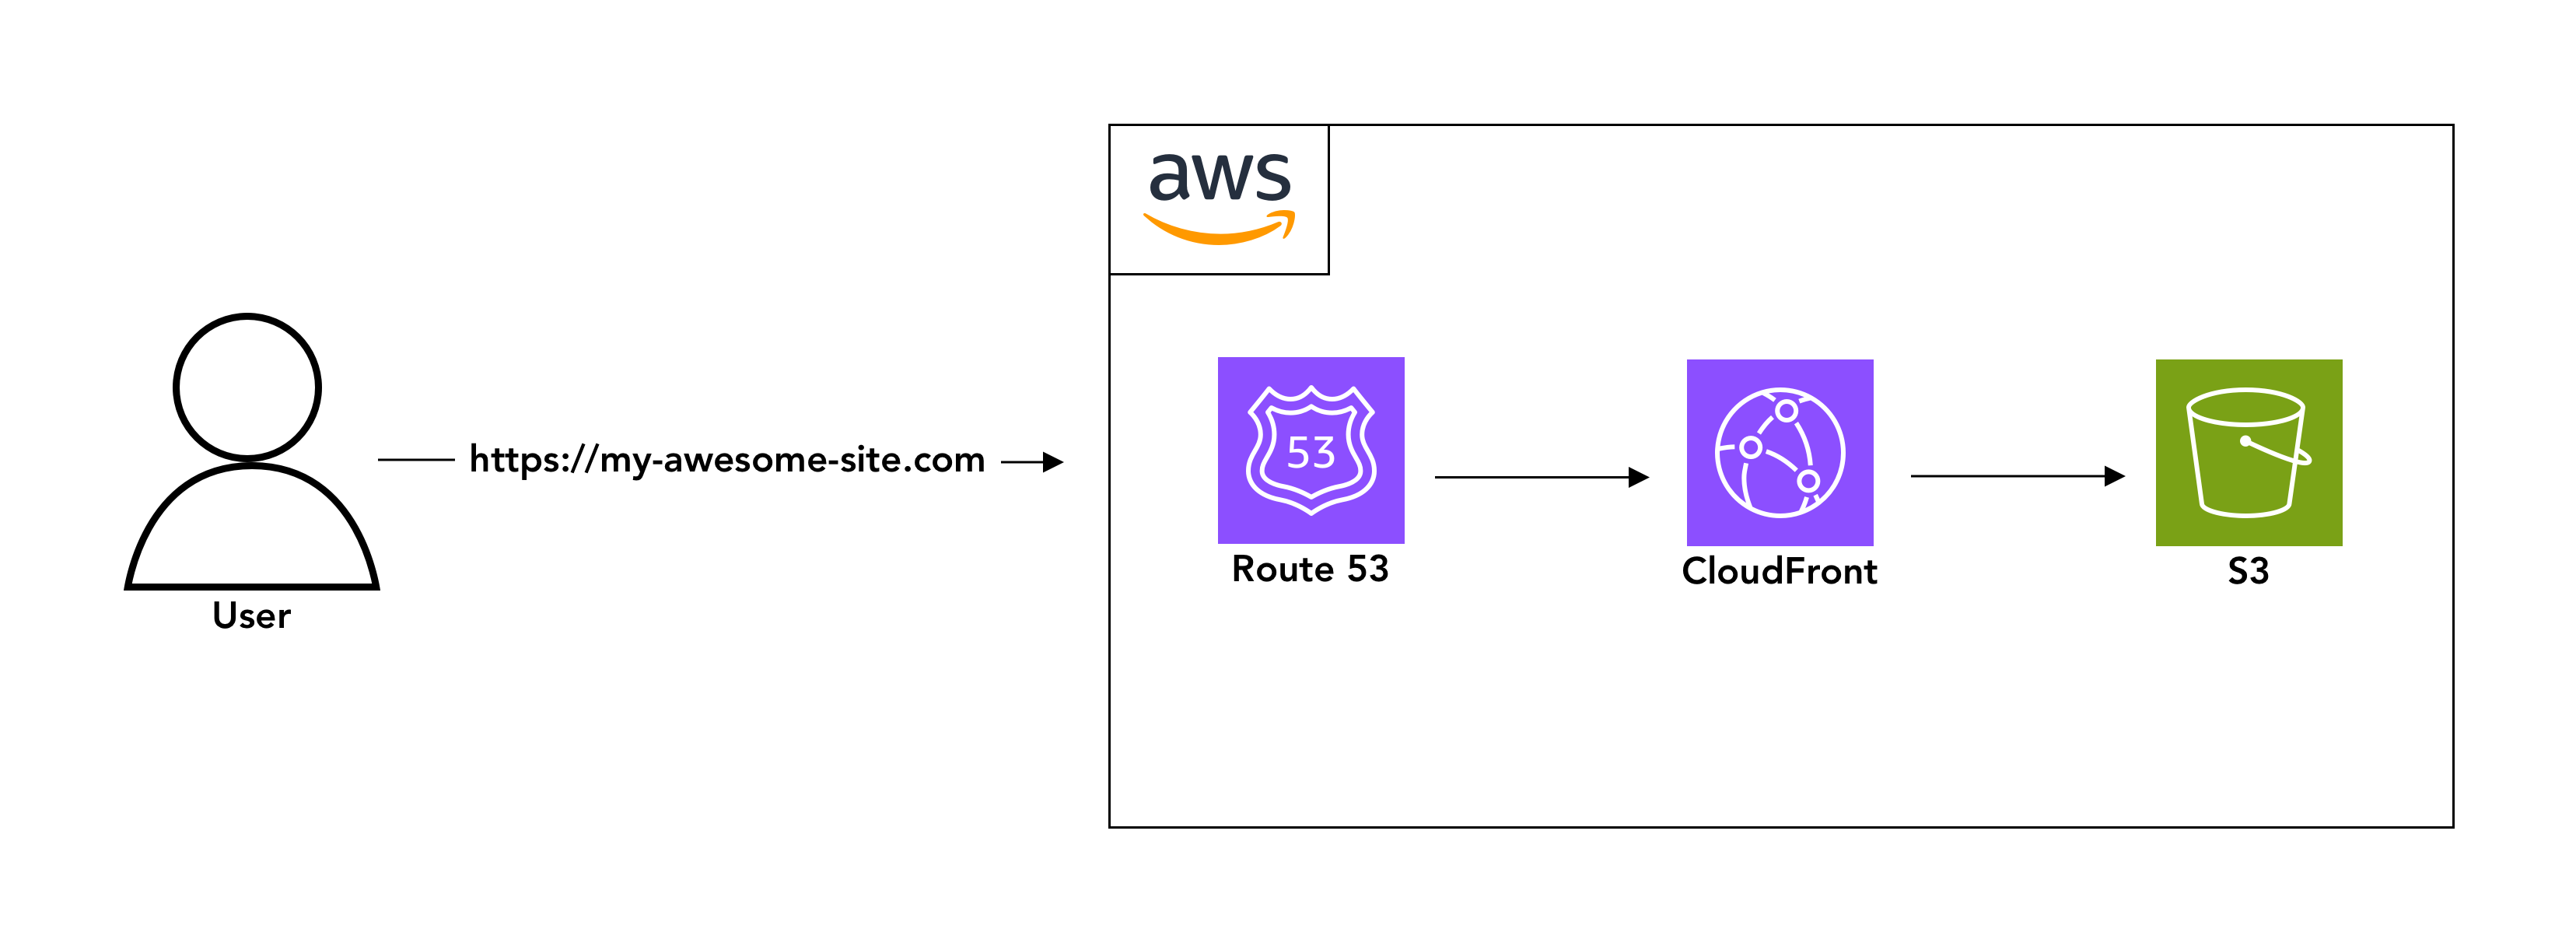
Once that’s all configured - your AWS stack is setup. A user will make a request to my-awesome-site.com, which will get directed to Route53, which will point to your CloudFront distribution, which will have a cached version of the contents that exist in your S3 bucket.
I made a basic diagram to visualise what’s happening.
Automate with GitHub Actions
Now that your website is hosted on S3 and distributed via CloudFront, that’s everything done right? Not quite so! Currently, to update your website you would have to open up your Terminal, and in the root directory of your repo, type:
hugo
Hugo would then create a static website, and put it within the public directory of your repo. You would then have to copy and paste all the contents within the public directory and upload them to your my-awesome-site.com S3 bucket. Finally, you would have to prompt your CloudFront distribution to invalidate its current cache and pull in a new copy from S3. This is quite a time consuming and laborious process.
Let’s automate it!
Now I’m assuming you are hosting your repo on Github, as we’ll be leveraging Github Actions for the Continuous Distribution pipeline.
Here’s how I set it up:
- Create a GitHub repository for your Hugo site.
- Set up GitHub Actions for Continuous Deployment. With each push to main, you can trigger a pipeline that: a. Builds your Hugo site b. Uploads the content to your S3 bucket c. Invalidates the CloudFront cache to ensure the latest content is served
Here’s an example of a basic GitHub Actions workflow that does just that:
name: Build and Deploy

on:
 push:
   branches: [ "main" ]

jobs:
  deploy:
    runs-on: ubuntu-latest
    steps:

    # Checks out your repository
    - name: Checkout
      uses: actions/checkout@v2

    # Setup Hugo
    - name: Setup Hugo
      uses: peaceiris/actions-hugo@v2
      with:
        hugo-version: 'latest' # specify the Hugo version you want

    # Build the Hugo site
    - name: Build
      run: hugo --minify

    # Deploys built website to S3
    - name: Deploy to S3
      run: hugo deploy --force --maxDeletes -1 --invalidateCDN
      env:
        AWS_ACCESS_KEY_ID: ${{ secrets.AWS_ACCESS_KEY_ID }}
        AWS_SECRET_ACCESS_KEY: ${{ secrets.AWS_SECRET_ACCESS_KEY }}
This pipeline does all the heavy lifting, ensuring that after each update, your site is deployed, and the cache is cleared. Now, instead of manually uploading files or fiddling with cache settings, the pipeline takes care of everything.
Hold on though, eagle-eyed readers would have noticed something. We are using secrets.AWS_ACCESS_KEY_ID and secrets.AWS_SECRET_ACCESS_KEY. What exactly are they?
These are AWS credentials that allow GitHub Actions to interact with your AWS account securely. Specifically:
- AWS_ACCESS_KEY_ID is the ID of an access key that grants programmatic access to your AWS account.
- AWS_SECRET_ACCESS_KEY is the secret part of that access key, which acts as a password to authenticate your requests.
By storing these in GitHub’s secrets, they are securely hidden from anyone browsing your code repository and ensure that only your GitHub Actions workflow can access them. To set these up, you’ll need to generate an access key in the AWS IAM console and then add them to your repository’s secrets under Settings > Secrets in GitHub.
This setup lets GitHub Actions push your static site to your S3 bucket and interact with other AWS services without exposing sensitive information publicly.
In the next section I’ll go over how to create AWS credentials that you can use for the automation pipeline, and how to securely insert them into your Github repo.
Creating Secure AWS Credentials
Venture back into your AWS Dashboard, and go into the Identity and Access Management portal, or IAM. IAM is a service within AWS that helps you securely manage access to your AWS resources. It allows you to create and manage users, groups, and roles with specific permissions.
With IAM, you can control who has access to what resources and at what level. For example, you can create users who have permission to only upload files to an S3 bucket or manage CloudFront distributions. The key benefit is that it enables you to implement the principle of least privilege, giving only the necessary permissions to each user or service to perform its tasks, thus reducing the risk of accidental or malicious actions.
We are going to create two policies; one for invalidating your my-awesome-site.com CloudFront distribution cache, and one for read/write access to your my-awesome-site.com bucket.
Policies Within IAM, navigate to the Policies section, and then select the “Create policy” button.
In the Policy Creation page, select the “JSON” toggle. Copy and paste the JSON below.
{
    "Version": "2012-10-17",
    "Statement": [
        {
            "Effect": "Allow",
            "Action": [
                "s3:ListBucket"
            ],
            "Resource": "arn:aws:s3:::my-awesome-site.com"
        },
        {
            "Effect": "Allow",
            "Action": [
                "s3:PutObject",
                "s3:GetObject",
                "s3:DeleteObject"
            ],
            "Resource": "arn:aws:s3:::my-awesome-site.com/*"
        }
    ]
}
Select the “Next” button. Then give the policy a name, like “MyAwesomeSite_S3”.
Create another policy, using the JSON below.
{
    "Version": "2012-10-17",
    "Statement": [
        {
            "Effect": "Allow",
            "Action": "cloudfront:CreateInvalidation",
            "Resource": "arn:aws:cloudfront::750590170583:distribution/E2A67O8F89PMSR"
        }
    ]
}
Select the “Next” button. Then give the policy a name, like “MyAwesomeSite_CloudFront_Invalidation”.
Users Now navigate to the “Users” section of IAM. Select the “Create user” button. Provide a username for this user, such as “myawesomesite_deployer”. Ensure the “Provide user acess to the AWS Management Console” checkbox is not selected.
Select the “Next” button.
For “Permissions options”, select “Attach policies directly”. In the list of permissions below, search for the names of the policies we created earlier. In our case, they are “MyAwesomeSite_S3”, and “MyAwesomeSite_CloudFront_Invalidation”.
Select the “Next” button, and then the “Create user” button.
Creating AWS Credentials
View the users profile within the IAM Users list. Within the “Summary” section, select the “Create access key” link. Select the “Command Line Interface (CLI)” for the “Use case”. Then select the “Create access key” button.
You will then be presented with an Access key and a Secret access key. Store these somewhere secure.
Storing the AWS Credentials in Github Actions
Open up your repo on Github, and navigate to the “Settings” tab. On the left-hand side menu, under the “Security” section, select “Secrets and variables”, and then “Actions”.
Under the “Secrets” tab, select “New repository secret”.
Put in “AWS_ACCESS_KEY_ID” for the name, and your access key for the value.
Do this once more, but put in “AWS_SECRET_ACCESS_KEY” for the name, and your secret key for the value.
Testing the New Ride!
Once everything is configured, it’s time to test the entire setup. Push your changes to the main branch of your GitHub repository, and you should see the GitHub Actions workflow kick off automatically.
Here’s what you’ll want to check during the process:
- GitHub Actions Pipeline: Head over to the Actions tab in your repository and verify that your deployment pipeline runs without errors. You should see it checkout your code, build your Hugo site, upload the content to your S3 bucket, and invalidate your CloudFront cache.
- S3 and CloudFront Setup: After the pipeline completes, check that your content has been successfully deployed to the S3 bucket and distributed via CloudFront. You can do this by visiting your domain (e.g., https://my-awesome-site.com) in a browser. Make sure everything is loading correctly, including any CSS, images, and other assets.
- SSL and Redirects: Test both the http:// and https:// versions of your site, as well as the www. and non-www. versions, to ensure they redirect correctly to the secure HTTPS version of your domain without the www. prefix. If you configured everything properly, CloudFront should automatically handle these redirects.
- Performance: One of the big perks of this setup is the improved performance thanks to CloudFront’s CDN. You should see significant speed improvements due to CloudFront’s ability to cache content globally at its edge locations. For even deeper insights, you can use tools like Google PageSpeed Insights or GTmetrix to check the loading times and optimisations.
Enjoy the Savings, Speed, and Scalability
By moving from an EC2 instance with MySQL and PHP to this Hugo + S3 + CloudFront setup, I cut my costs down from $25 to $4/month. This includes the cost of the S3 bucket, CloudFront distribution, and small amounts of data transfer fees.
Not only am I saving money, but my site is faster, I don’t have to worry about server maintenance, and AWS automatically handles SSL for me.
Hosting a static website in 2024 doesn’t have to cost a fortune. Moving to Hugo, S3, and CloudFront has been a game-changer for me. It’s faster, more efficient, and much cheaper.
If you’re still hosting your blog on an EC2 instance, I recommend giving this setup a try. The time you invest in setting up Hugo and AWS will pay off quickly in terms of cost savings and the peace of mind that comes from a more maintainable solution.
And if you’re looking for more ways to optimise your setup or have any questions about this process, feel free to reach out!
Photograph Credit: Sora Shimazaki, Source: https://www.pexels.com/photo/online-shopping-5935739/